The Altera Centauri collection has been brought up to date by Darsnan. It comprises every decent scenario he's been able to find anywhere on the web, going back over 20 years.
25 themes/skins/styles are now available to members. Check the select drop-down at the bottom-left of each page.
Call To Power 2 Cradle 3+ mod in progress: https://apolyton.net/forum/other-games/call-to-power-2/ctp2-creation/9437883-making-cradle-3-fully-compatible-with-the-apolyton-edition
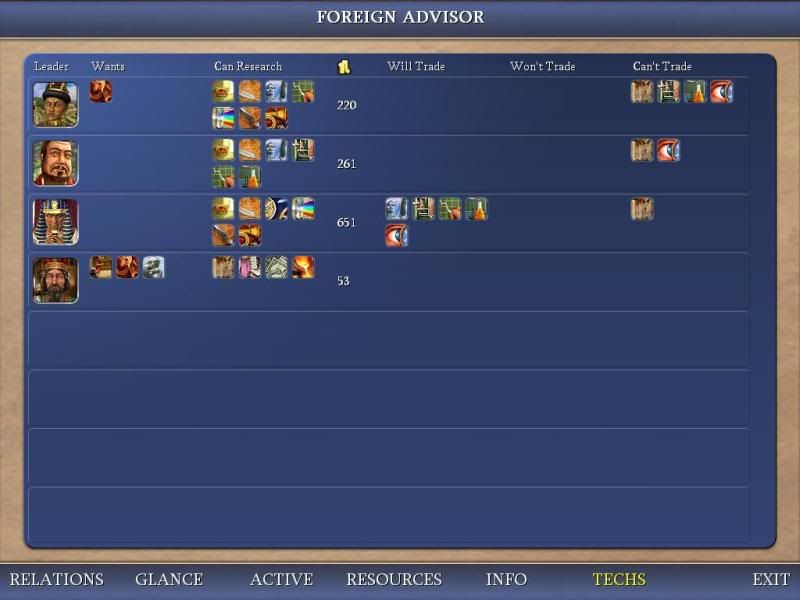
I can't remember...where is Imperio's Iron source? It would be great to pillage it with a Spy althouth I seem to recall they settled on it. PAL seems to be saving cash now, possibe gift to Imperio for upgrades?
Actually, CG3 longbow + cuirassier + pike isn't even as bad as what I simmed (which was CG2 longbow + CG2 musket + pike). I'll run some new sims in a bit and post the results here.
Imperio becoming PAL's vassal was completely expected. I thought we'd see some tech gifting in the wake of our attack. However, the important thing is that we cut Imperio's iron supply with a razing of Mutal, rendering Steel for cannons pretty much useless.
The stack in the south moving onto the hill is a bad move, IMO. Our workers can road to that tile and kill everything there. Since most of those units are wounded, we'll probably want to get them before they can escape back into Imperio territory and heal.
Finally, I'll run C&D numbers before our turn and try to estimate what Imperio whipped. Unfortunately, them playing and ending their turn last means I can't get completely accurate info. Should be able to make some reasonable guesses though.
OK, first choosing the best promotion and attack order:
- The CG3 longbow is the top defender no matter what unit we select.
- Mounted units cannot get Cover (anti-archer) promotion, and even if they could, I found in the Worldbuilder that it barely increased the combat odds (22.7% to 26.8%).
- Combat 3 promotion has the same effect as Cover - not much (22.7% to 26.8%).
- Therefore, it seems like a better idea to wait and use that promotion on either Shock or Formation.
- After wounding the longbow, the next matchup always occurs against the pikeman. The odds are 28.8% with C2 cuirassier and 34.1% with a CG2/Shock cuirassier. Again, this doesn't seem like the best use of the promotion.
- After wounding the pike, obviously the C1 cuirassier defends. Our own C2 cuirassiers have 67.6% odds. However, if we take the Formation promotion, that goes up to 79.8%. This seems like the best use of our extra promotion to me.
That would make the attack order:
- C2 cuirassier versus longbow (22.7%)
- C2 cuirassier versus pike (28.8%)
- C2For cuirassier versus cuirassier (79.8%)
- Last cuirassier
- Horse archers
I used this attack order and did a bunch of simming of the battle:
1) 0 units die, SUCCESS
2) 1c dies, SUCCESS
3) 3c + 3ha die, FAILURE (monstrously unlucky here, two cuir died to pike and did no damage at all!)
4) 4c + 3ha die, FAILURE (wow... more crazy attacks and no damage)
5) 0 units die, SUCCESS
6) 1c dies, SUCCESS
7) 2c die, SUCCESS
8) 2c die, SUCCESS
9) 3c + 1ha die, SUCCESS
10) 2c + 1ha die, SUCCESS
11) 1c dies, SUCCESS
12) 1c dies, SUCCESS
13) 1c dies, SUCCESS
14) 1c + 2ha die, SUCCESS
15) 3c die, SUCCESS
16) 1c + 1ha die, SUCCESS
17) 1c dies, SUCCESS
18) 2c die, SUCCESS
19) 2c die, SUCCESS
20) 1c dies, SUCCESS
OK, so that's a success rate of roughly 90%. It's possible for us to fail, but we have to get very, VERY unlucky in the combat rolls, with multiple cuirassiers attacking and doing no damage. Let's pray to the RNG that we just get average combat results here.
Most of the time, I used the Formation promotion for our cuirassier, but there were times when it flipped the matchup between the defending cuirassier and an injured longbow or pike. In those situations, I used Combat 3 instead. It will be pretty obvious when this occurs (usually, the longbow/pike would be around 4/6 health). We will figure this one out as we go along through the attack.
Imperio becoming PAL's vassal was completely expected.
I wonder if PAL is aware of the situation. And I wonder how many cities Imperio expect to get as a result of this newest vassalage.
Nice job on the combat sim. It also seems like it will be clear -- if the RNG gives a string of no-damage to the pike rolls -- that we can break off the attack.
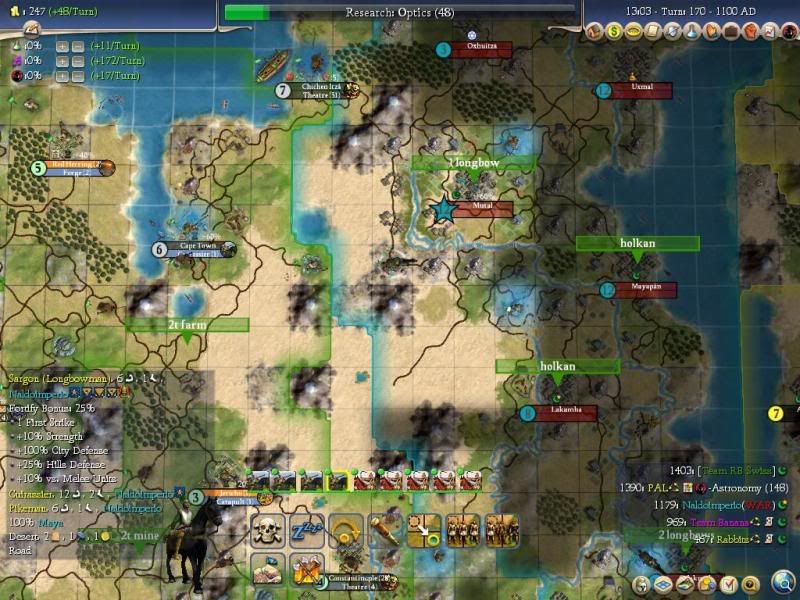
Trying to make sense of all this... Mutal double-whipped a pike for a defender, then a pop grew back interturn. Lakamha whipped something, difficult to say what because there were no shields in the box last turn. Uxmal and Mayapan did enormous whips, 3 and 4 pop respectively, but they overflowed right back into their previous builds, so it's again hard to say what they produced. Calakmul and Oxhuitza swapped builds, but did not whip, probably because neither is in immediate danger. If Imperio is smart, they likely whipped a couple of cannon before they lose access to iron.
As for the Imperio units running around... Mutalac the pike was a holkan defending in Lakamha; it moved NW two tiles and then upgraded. For the stack NE of Mutal, the musket was produced 2t ago in Uxmal, and stayed in the city for a turn. (We are extremely lucky it didn't move south immediately, or we'd have 4 defenders in Mutal and essentially no chance of capturing it!) The longbow was the defender in Uxmal itself. Lakan the holkan was the defender in Mayapan. And the warrior was the defender in Oxhuitza. So all of those cities were emptied out, and new units whipped in their place last turn. But they are all going to be slightly too late to reach Mutal this turn!
We are going to have to be careful at Chichen Itza, however, because our Mounted stack is going to be drastically weakened even if the attack succeeds, and those units will be able to move on our frontier afterwards.
Will do PAL's info later, not as critical right now.
Are we going to have a combat chat again? And at what time?
Not sure that we can guarantee to have many people around this weekend. sunrise has the inlaws round, so I'm not sure whether he'll be available to play the turn. It'd be best if some of our North American team members can arrange to play tonight, so we have time to mull over plan B if things pan out badly at Mutal before the end of our turn.
I certainly can play the turn (having done all those sims of Mutal!) but with 16 hours remaining on the clock, there's plenty of time for sunrise to tell us his plans. Unless we get down to under 5 hours, I say we want for the Turnplayer before taking any action.
There's a little over 12 hours left on the turn right now. Unfortunately, most of that time is going to run through the night here in the eastern US where sunrise and I live. Now I don't feel confident going to bed tonight, leaving less than 8 hours left on the save and nothing played, nor do I want to wake up tomorrow and have to cram all of our actions into a tiny window of a couple hours. Therefore, unless sunrise posts something in this forum, I'm going to play the save in about 3 hours and report back here afterwards. I don't really want to set up a chat session, but I certainly will report right away with whatever happens. Since the attack on Mutal is completely simmed out, all it remains is to hope that we get good, average, or bad luck from the dice. (Anything other than "horrible" luck will suffice!)
In the south, all of our units are hurt, so I plan to keep them in place and let the Great General Medic do its work. The schedule has us healing this turn (T170), using our City Raider units to capture Acre next turn (T171) one turn before it comes out of revolt, and then moving towards the next Imperio city the turn after that (T172). Or more precisely, we'll re-evaluate then depending on how things look.
My preference is still to let sunrise play the turn, but I think it's massively unwise to wait and try to do everything at the last minute.
Few suggestions - I know we have a lot of units to heal, but those 5 mostly-wounded units on the hill are real tempting. Not sure which is best but I would like some discussion of if it's worth going after them or not. Only a few hours left, but one can hope
Also, I'm a little worried about Imperio striking back and razing Damascus with workers, that Cur, and some hidden units. Suggest moving the longbows from the southern cat stack into the city and merging the cats into the main stack.
Finally, remember to promote the wounded units that won't always heal in one turn. I think the ability of Drill to lead to the anti-unit types is nice for Oromos but in this case I would move them further up Drill since we don't know what they will face. It's sadly useless against Knights and Curiassers but barring horrid luck we won't see many more of them.
I imagine these are not new ideas to Sullla's mind, but feel compelled to point them out since his posted plan is real breif.
We've been thinking a lot about the next move to make in the south. Meanwhile, here's what I'm thinking about how to move on the northern front:
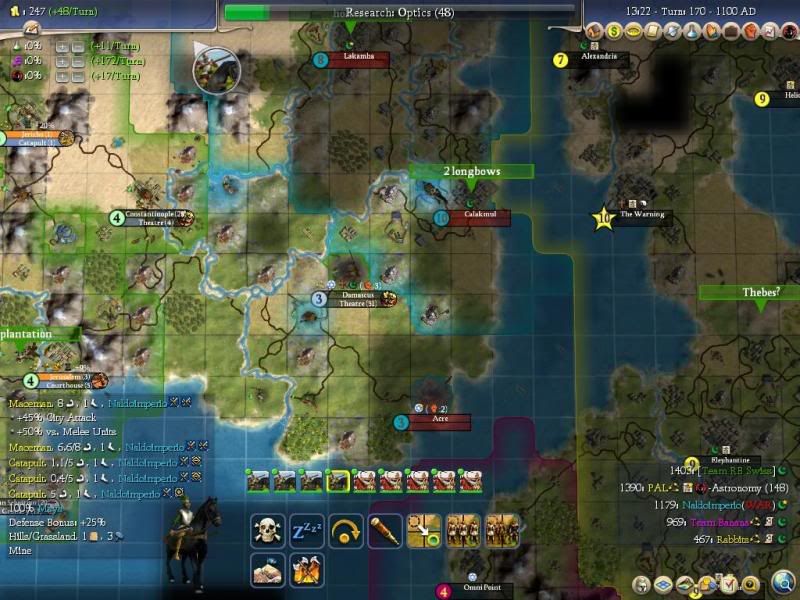
We have four leftover horse archers from the successful attack on Mutal. If we move quickly, we can possibly get some more great use out of them! I'm proposing that we move those units to the tile one south of Chichen Itza next turn (T171), as indicated on the yellow arrows. Imperio should not have visibility on that tile (they would from the hill tile 2W of Oxhuitza, but the forest tile to its SW blocks visibility, I believe). From there, we move up to the northeast on T172, onto a hill tile that grants us access to Oxhuitza, and in preparation for an attack on T173. Because Imperio has no roads in that area, they won't be able to counterattack our horse archers, and if Oxhuitza turns out to have strong defense, we simply move SW-SW back to the safety of Chichen Itza. It's basically a free peek into the city, and if we see a weak defense, we go after it.
I think we might have a fair shot at the city, however. Imperio emptied out everything in the north to try to reinforce Mutal; Uxmal and Oxhuitza had their garrisons moved to that staging tile NE of Mutal, and Oxhuitz was completely empty last turn. They will have to spend this turn mopping up our injured cuirassiers, and then that leaves them barely any time to get units back north to Oxhuitza. Plus, the key element of this attack is surprise: our horse archers were last seen retreating to the south, then suddenly they appear out of nowhere to the northeast of Oxhuitza! Anyway, it's certainly worth a shot, since there's no danger to our units.
sunrise, we also want to start moving our three naval units (or at least one of them!) up to the ice passage in the north. Taking Chichen Itza was key for us, because it deprived Imperio of their only port city on the western coast. But they still have three ports in the Channel to the east (Uxmal, Mayapan, and Calakmul), plus Banana just traded them Astronomy. We need to get ships up there in the north to provide maximum warning of an incoming Imperio galleon move, should it arrive. The only nice thing about those narrow waters is that Imperio can't sneak past us, and we'll have several turns to plan something and react accordingly. But we need at least one ship up there to do that, and preferably more so that they can't sink all our watchers in one go...
 Tweet
Tweet


Comment